
Using USC's Cryo-EM Instruments
USC has two cryogenic electron microscopes (cyro-EM) available for use:
- Krios with the K3 direct detection camera
- Glacios with the Falcon 4 direct detection camera, both manufactured by Thermo Fisher.
Both instruments are housed in the Michelson Center for Convergent Bioscience building in the Core Center for Excellence in Nano Imaging (CNI) at USC's University Park campus.
This user guide explains how to get started using the new microscopes, including setting up your cryo-EM project and allocations in the CARC User Portal, reserving the microscopes using CNI's reservation system, configuring the data acquisition process and pre-processing parameters, accessing the microscope data, and analyzing the data.
Creating a cryo-EM project in the CARC User Portal
To use the cryo-EM instruments, you must have a project and associated resource allocations in the CARC User Portal. You can create a new project for your cryo-EM work or add the required resource allocations to an existing project.
The project associated cryo-EM instruments will need:
- Cryo-EM subscription allocation
- Cryo-EM storage allocation (check the current pricing at our Accounts and Allocations page)
- Discovery cluster allocation or access to an Endeavour compute node
- (Optional) Project storage allocation
Allocation pricing information can be found on our Accounts and Allocations page.
See the Request New Allocation user guide for detailed instructions for requesting allocations for your project. New requests are generally approved by CARC staff within 24 hours.
You can view all CARC User Portal guides here. These guides explain how to manage your projects and allocations, how to add or remove users for your projects, how to complete your annual project and allocation renewals, and more.
A cryo-EM subscription giver users access to the following resources:
- Access to the cryo-EM pre-processing portal where you can get live feedback during the data acquisition process
- GPU cluster with 10 GPU compute nodes
- Access to a shared storage space (
/cryoem2) for the datasets collected by the microscopes. Note that datasets will only be stored in this shared space for 14 days due to the large amount of data generated by the microscopes. You can learn more about transferring data to your personal CARC directories (or elsewhere) in our Data Management user guides.
Reserving a microscope
To reserve time to use the microscopes, you must submit a request through CNI's reservation system.
Note: use of the microscopes is a paid service—pricing details can be found here.
Using the microscope
When your reservation time begins, log in to the CNI client on the microscope's support PC. Use the microscope's control PC to configure the data acquisition process for the microscope you're using.
Important: Make absolutely sure that you follow the file naming scheme below or your data will not be transferred from the microscope.
The data acquisition protocol is similar for both microscopes:
→ Data acquisition protocol for Krios
- Open EPU program on control PC
- Create a new session
- Give the session a name of the form
YYYYMMDD_USC_<USC NetID of the user>_<Cryo-EM project ID>_k3_<sample_name> - Change storage directory to X
- Change file type to TIFF (not MRC)
- Proceed to grid square and hole selection
- Execute the template
- Open the web application to initiate the cryo-Pegasus process
→ Data acquisition protocol for Glacios
- Open EPU program on control PC
- Create a new session
- Give the session a name of the form
YYYYMMDD_USC_<USC NetID of the user>_<Cryo-EM project ID>_f4_<sample_name> - Change storage directory to M:
- Change file type to TIFF if you want to use our on-the-fly pre-processing (EER is in the works)
- Proceed to grid square and hole selection
- Copy gain reference to the session directory on M:\
YYYYMMDD_USC_<USC NetID of the user>_<Cryo-EM project ID>_f4_<sample_name> - Execute the template
- Open the web application to initiate the cryo-Pegasus process
After setting up the data acquisition process for the microscope, log in to the CARC cryo-EM user portal in a web browser and navigate to the Instrument CheckOut/Return page:
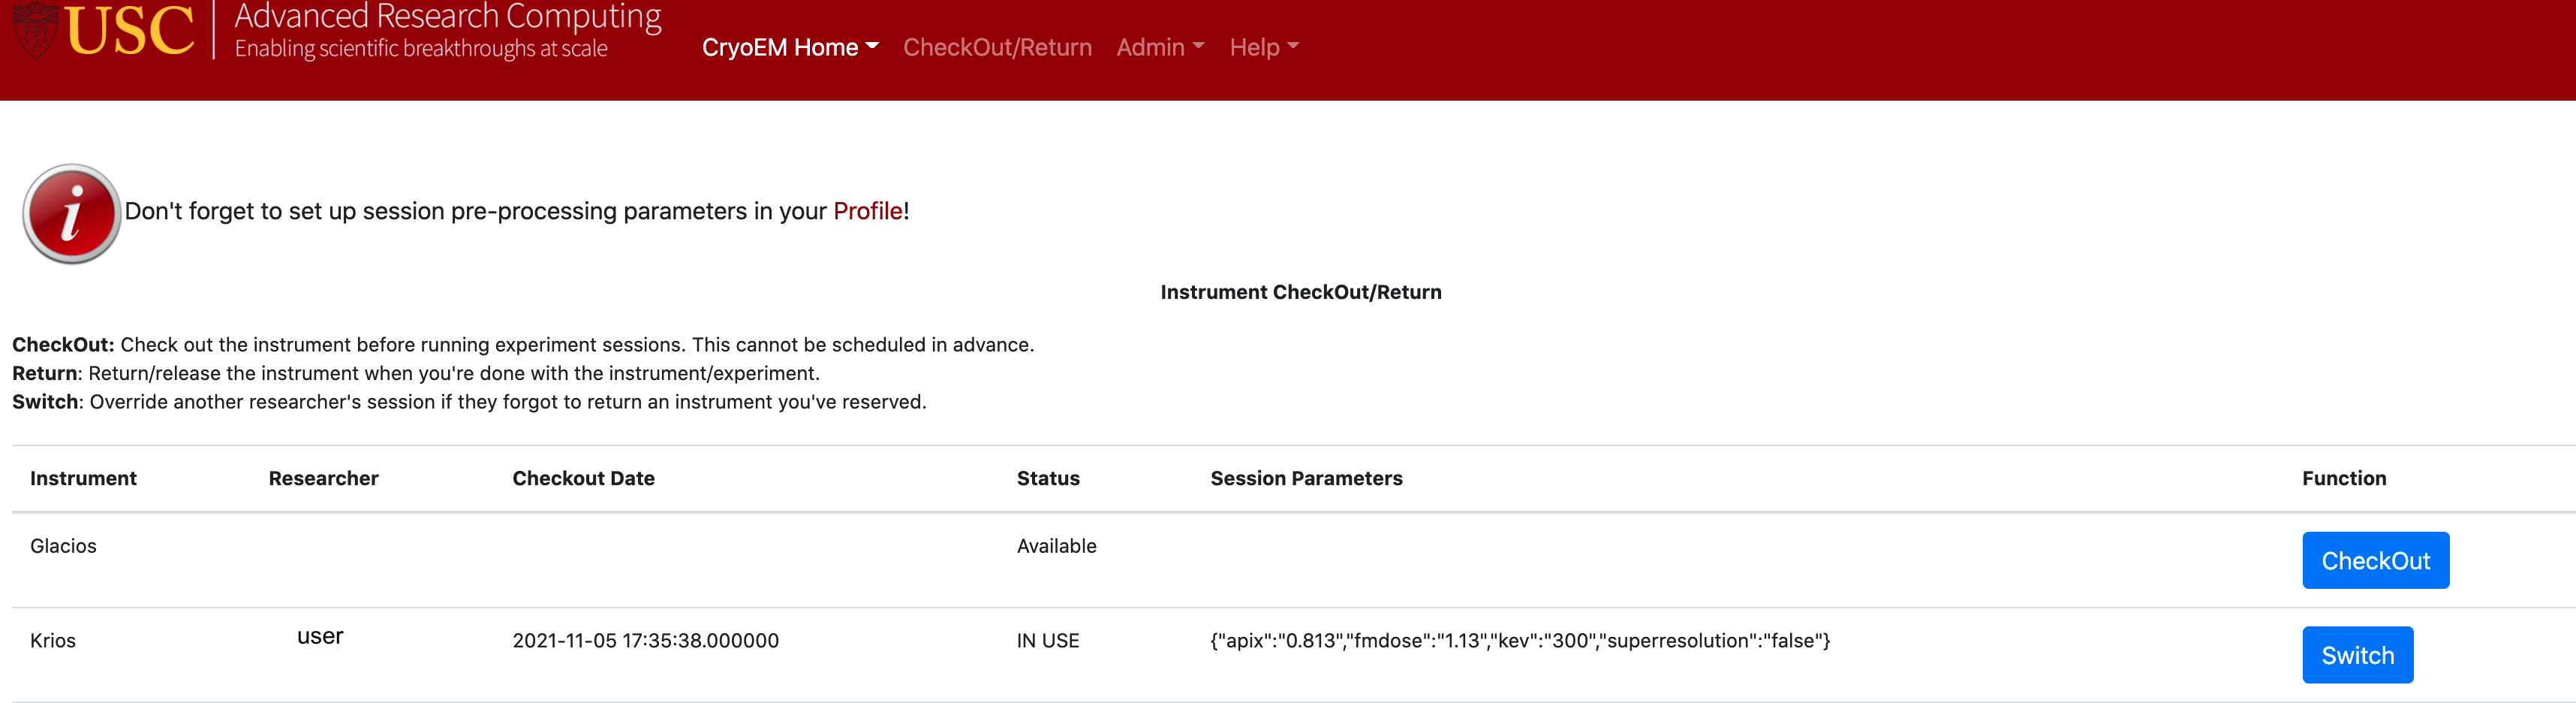
Click the blue CheckOut button for the microscope you reserved and set the following pre-processing parameters:
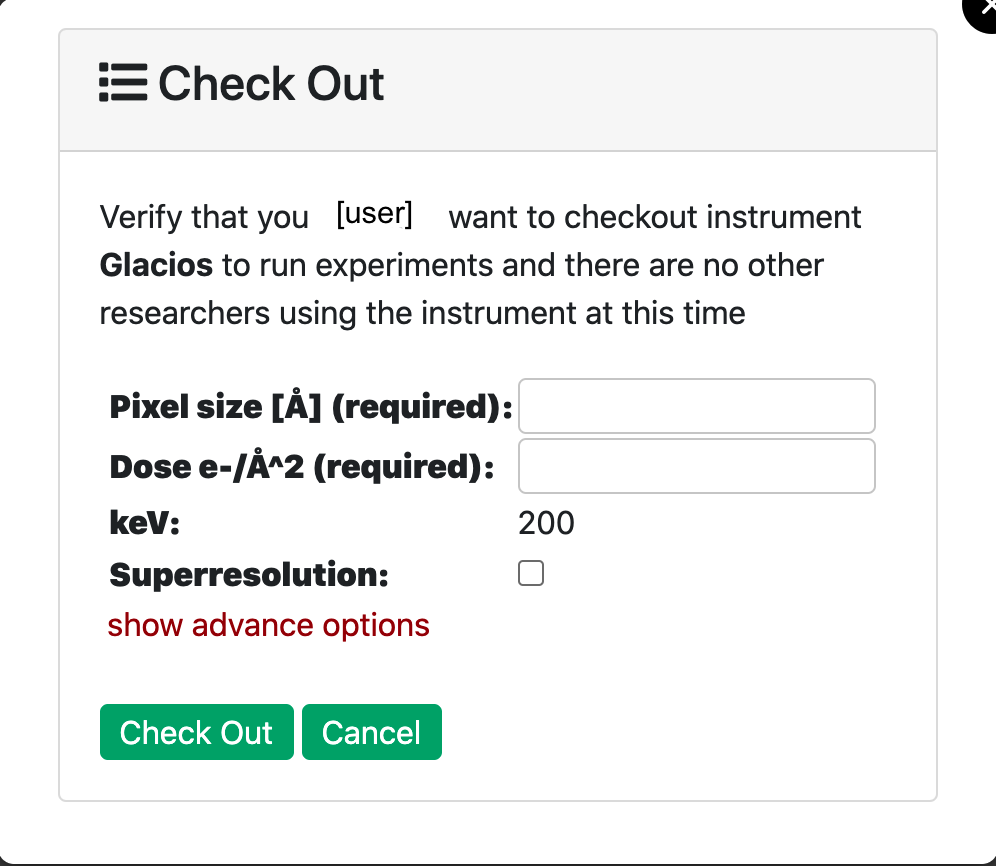
- Project_ID: choose a project you are a member of to use with the Cryo-EM processing.
- Pixel size: Determined during data acquisition setup. Usually between 0.6 and 1.1.
- Dose of electrons per Angstrom square per frame (Dose e-/Å^2): Determined during data acquisition setup. Usually it is about 50 electrons per 40 frames.
- keV: 300 for Krios, 200 for Glacios.
These parameters are used by the Cryo-pegasus data pre-processing workflow powered by Pegasus, a workflow management system.
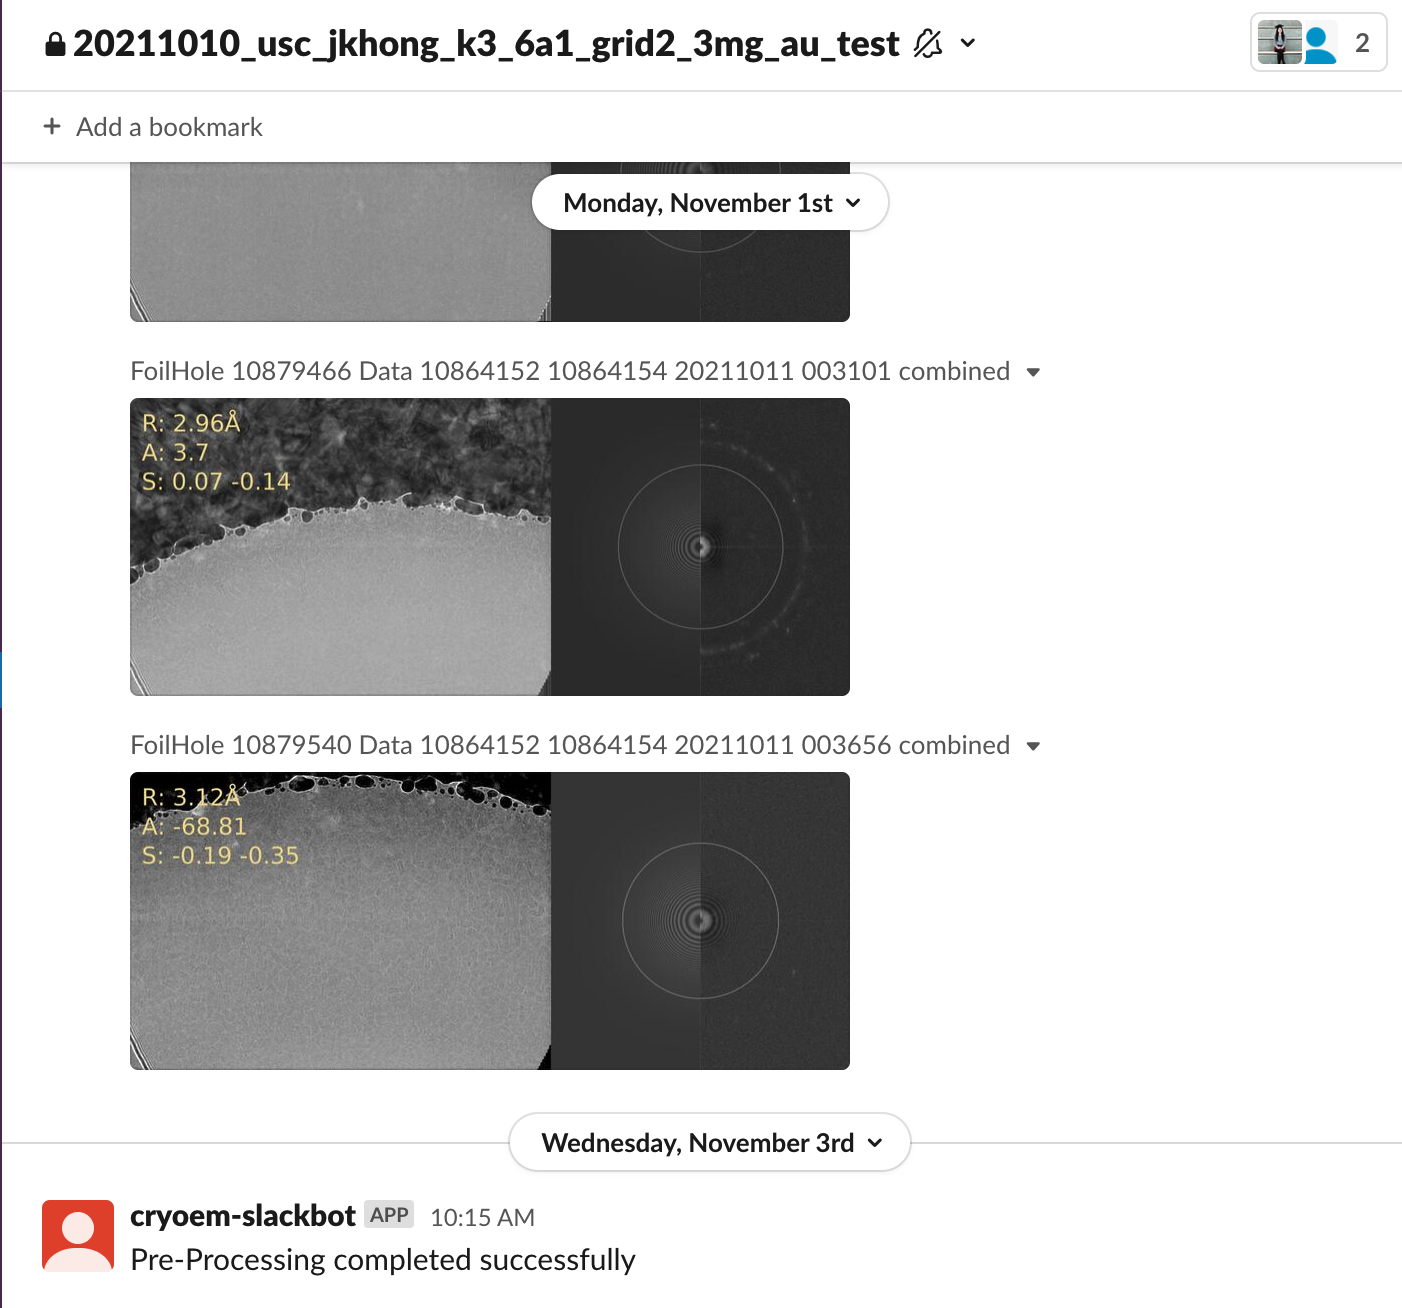
Once the microscope has been checked out with the pre-processing parameters set, the transfer and processing of data from the microscope is automated. If this is your first time using the microscopes, you will be added to a Slack workspace called USC CARC cryo-EM. You will then be added to a private Slack channel dedicated to the microscope session you just created where you will be able to view the pre-processed images from the microscope as they are transferred, with every image labeled with its potential (R)esolution, (A)stigmatism and the average (S)hifts:
Data should begin flowing from the microscope in about ten minutes.
When you are finished using the microscope, "return it" in the CARC user portal using the Instrument CheckOut/Return page. This makes it available for the next user to check out. Use the "Switch" option to override another user's session if they forgot to return an instrument you've reserved.
Accessing your data
Data from the microscope is saved within your project directory in the cryo-EM shared file system (/cryoem2) in a subdirectory with a name of the form YYYYMMDD_USC_<USC NetID of the user>_<Cryo-EM project ID>_<detector>_<sample_name> (e.g., 20230801_USC_ttrojan_ttrojan_k3_mysample). The data in this subdirectory includes the raw data, as well as the processed images.
Note: This subdirectory in
/cryoem2is different from your main /project directory in the CARC /project file system.
You can access the cryoem2 file system by logging in to the cryo-EM login node (knoll.usc.edu), which is set to be accessible the same way as other CARC login nodes.
ssh <username>@knoll.usc.eduSubstitute your USC NetID as the username. This is the same username as your USC email account (e.g., ttrojan@usc.edu's NetID is ttrojan). After entering the command, you will then be prompted to enter your USC NetID password. This is the same password for your USC email account.
Note: There is no visual feedback as you enter your password. This is a security feature designed to obscure your password and is expected.
After entering your password, complete the Duo two-factor authentication prompt. You can learn more about transferring data from cryoem2 to your personal CARC directories (or elsewhere) in our Data Management user guides.
Analyzing your data
CARC provides access to a managed instance of cryoSPARC processing software, which supports fast and convenient dataset analysis and 3D reconstruction. With the use of cryoSPARC Live, you can process your data and observe results in real time. To request access to cryoSPARC, please contact us by submitting a help ticket.
Note: Accessing cryoSPARC requires an on-campus wi-fi connection or the use of a USC VPN; see the Connecting to a USC VPN user guide for instructions.
CARC also provides a range of cryo-EM data processing software on the Discovery and Endeavour clusters:
- Relion: A software package that employs an empirical Bayesian approach for cryo-EM structure determination.
- MotionCor2: Correction of electron beam-induced sample motion.
- ctffind4: A fast program for finding the Contrast Transfer Functions of electron micrographs (CPU only version).
- gctf: Accurate and robust real-time GPU accelerated CTF determination.
- pyEM: A selection of Python programs for cryo-EM.
- EMAN2: A broadly based greyscale scientific image processing suite with a primary focus on processing data from transmission electron microscopes.
- EMAN: A suite of scientific image processing tools aimed primarily at the transmission electron microscopy (old, but some tools are still useful).
- IMOD: A set of image processing, modeling, and display programs used for tomographic reconstruction and for 3D reconstruction of EM serial sections and optical sections.
Additional resources
The team running the Biowulf cluster at NIH provides an in-depth guide to use Relion on a cluster with slurm. After a minimal adjustments for resources available at CARC it can be used to prepare and successfully run jobs.