Horovod for Distributed Deep Learning
Popular Deep Learning packages, like TensorFlow and PyTorch, are designed to rely on one single GPU, or at most on one node, to conduct the underlying calculations. With an ever-increasing demand for more complex models, this limitation poses difficulties for many research teams scaling their research models and testing them in real-life applications.
Horovod is an open source toolkit, originally developed at Uber, that facilitates distributed Deep Learning computations while requiring minimal modifications to the existing TensorFlow and PyTorch codes. This package is available under the Apache 2.0 license (https://github.com/horovod/horovod).
In order to install Horovod with TensorFlow on discovery, the following recipe may be followed:
module purge
module load usc
module load anaconda3
module load cuda/11.1-1
module load nccl/2.8.3-1-cuda
module load pmix/2.2.2

conda create --name horovod-tf python=3.8
conda activate horovod-tf
conda install -c conda-forge tensorflow-gpu keras

MPI_BIN=$(which mpirun) ; export MPI_DIR=${MPI_BIN%/*/*}
export LD_LIBRARY_PATH={MPI_DIR}/lib:$LD_LIBRARY_PATH

export HOROVOD_NCCL_HOME=$NCCL_ROOT
export HOROVOD_WITH_TENSORFLOW=1
export HOROVOD_WITH_MPI=1
export HOROVOD_GPU_ALLREDUCE=NCCL
CC=mpicc CXX=mpicxx pip install --no-cache-dir horovod
In order to test your installation and check the computational performance of the system, we use the training via synthetic images that can be addressed via this script:
wget https://raw.githubusercontent.com/horovod/horovod/master/examples/tensorflow2/tensorflow2_synthetic_benchmark.py To launch the computations, we would ask for 1 node with 2X P100 GPUs:
salloc --partition=gpu --gres=gpu:p100:2 --time=02:00:00 --exclusiveand follow the steps given below:
module purge
module load usc
module load anaconda3
module load cuda/11.1-1
module load nccl/2.8.3-1-cuda
module load pmix/2.2.2
MPI_BIN=$(which mpirun) ; export MPI_DIR=${MPI_BIN%/*/*}
export LD_LIBRARY_PATH={MPI_DIR}/lib:$LD_LIBRARY_PATH

conda activate horovod-tf

mpirun -n 2 python tensorflow2_synthetic_benchmark.py > out
In order to install and test Horovod with PyTorch, we need to create a new Conda environment:
module purge
module load usc
module load cuda/11.1-1
module load nccl/2.8.3-1-cuda
module load pmix/2.2.2
module load anaconda3

conda create --name horovod-torch python=3.8
conda activate horovod-torch
conda install pytorch torchvision torchaudio cudatoolkit=11.3 -c pytorch

MPI_BIN=$(which mpirun) ; export MPI_DIR=${MPI_BIN%/*/*}
export LD_LIBRARY_PATH={MPI_DIR}/lib:$LD_LIBRARY_PATH

export HOROVOD_NCCL_HOME=$NCCL_ROOT
export HOROVOD_WITH_PYTORCH=1
export HOROVOD_WITH_MPI=1
export HOROVOD_GPU_ALLREDUCE=NCCL

CC=mpicc CXX=mpicxx pip install --no-cache-dir horovod
The script for carrying out the benchmark test using synthetic images on PyTorch can be accessed here:
wget https://raw.githubusercontent.com/horovod/horovod/master/examples/pytorch/pytorch_synthetic_benchmark.pyA similar process can be followed to request 1 node with 2X P100 GPUs and run the synthetic benchmark.
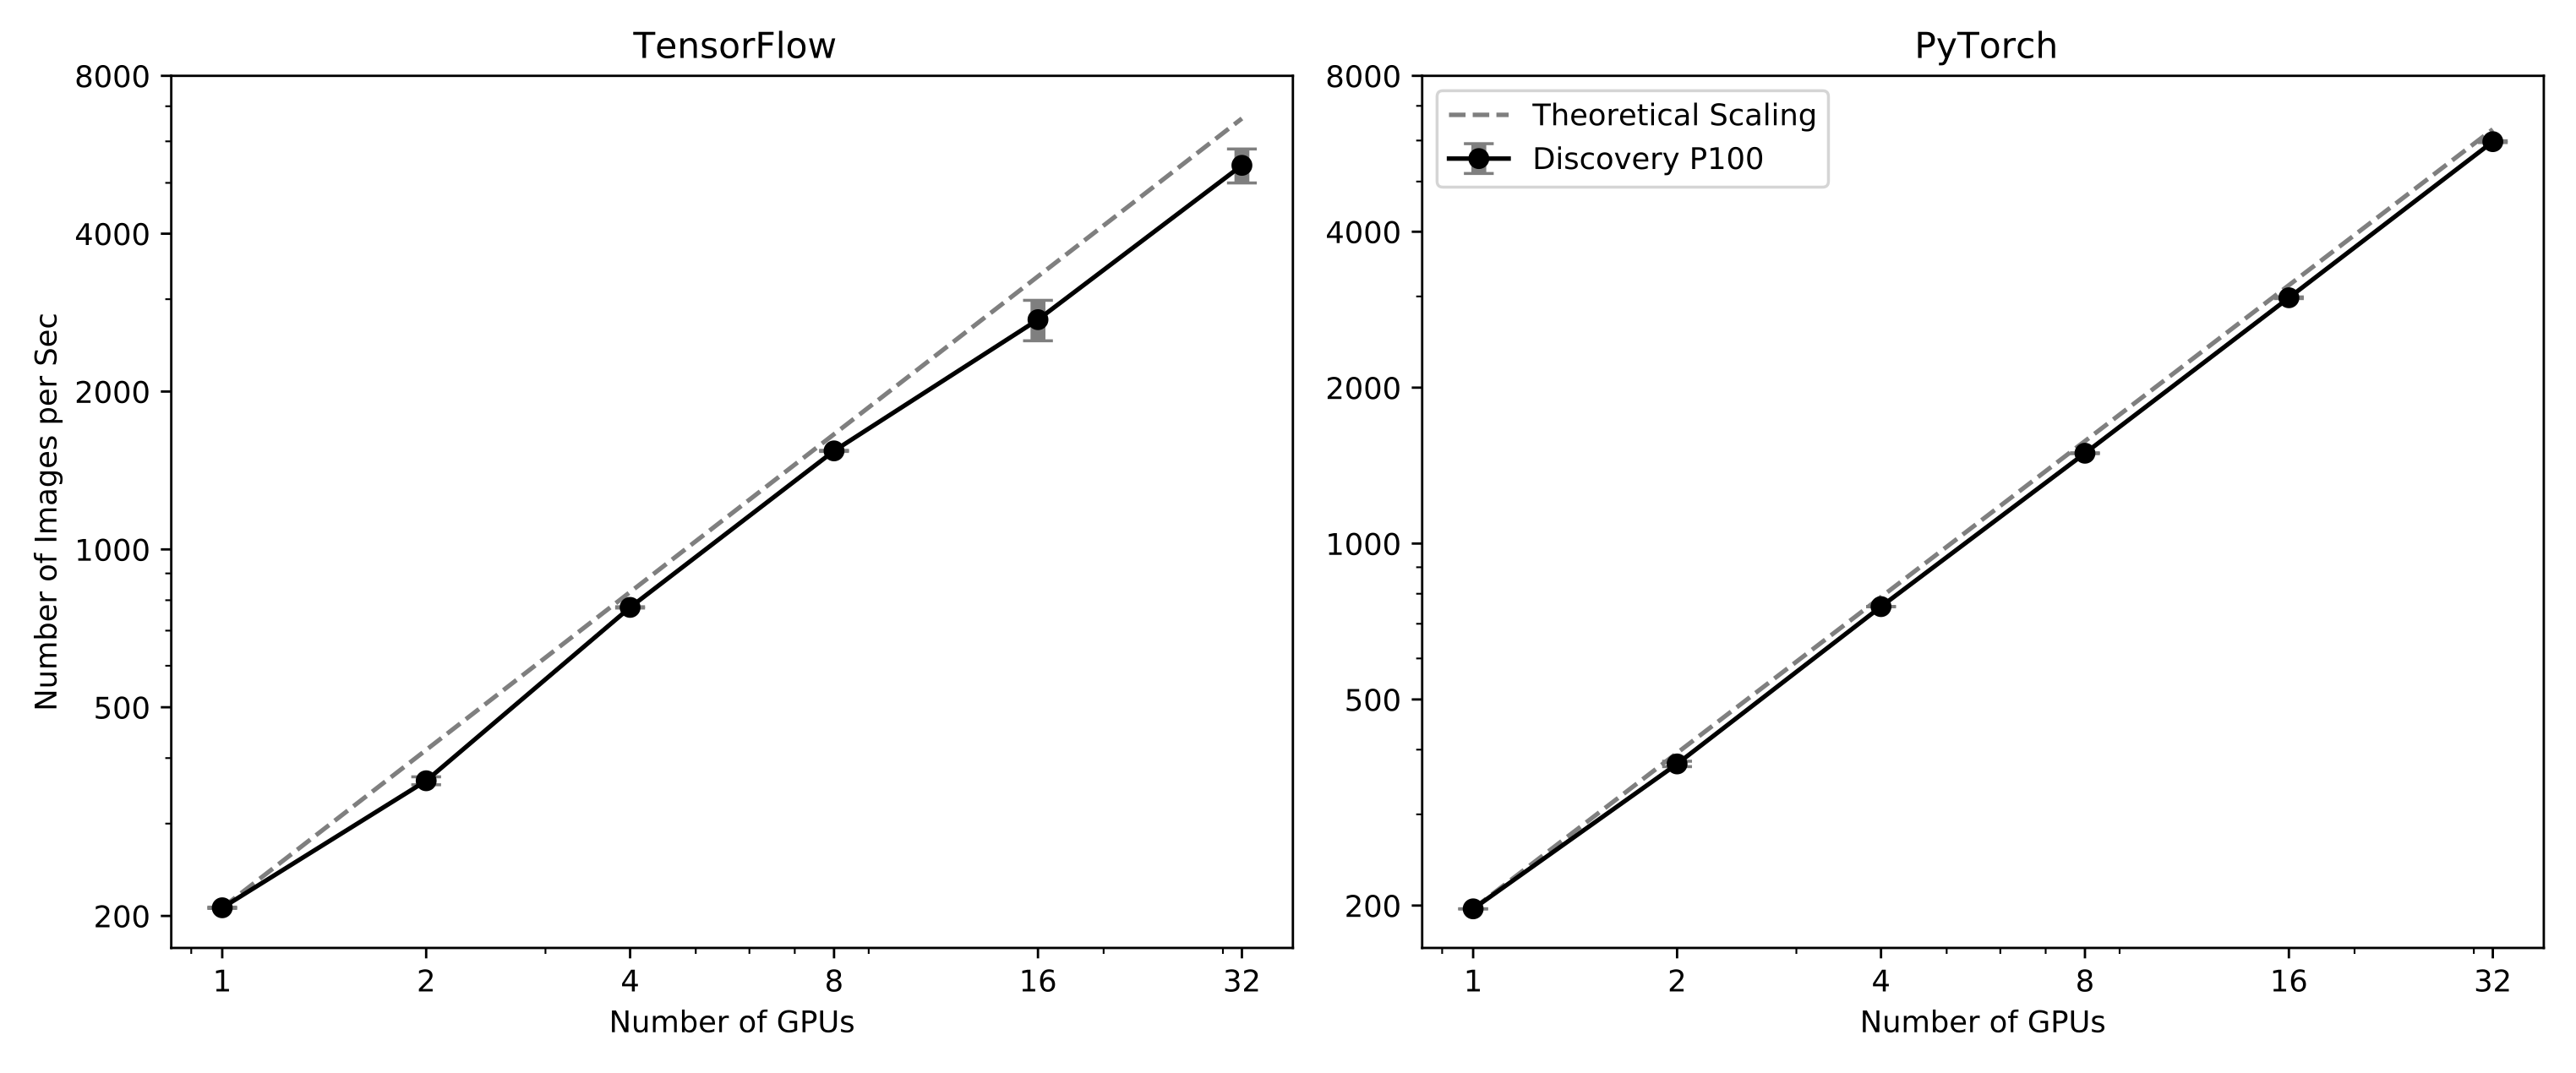
Below is the strong scaling plot using these tests on Discovery nodes with 2x P100 Nvidia GPUs: